How to Remove Lawn Mower Blade in 5 Easy Steps
To remove your lawn mower blade in 5 easy steps, start by gathering essential tools like a socket wrench and a block of wood, and make sure to wear gloves for safety. Removing a lawn mower blade is a straightforward task that anyone can do with the right preparation.
Securing the mower on a flat surface and disconnecting the spark plug are crucial safety steps before you begin.
Next, loosen the blade bolts by turning them counterclockwise, using the block of wood to prevent the blade from spinning.
Carefully detach the blade, paying close attention to its orientation so you can reinstall it correctly.
Finally, inspect the blade for damage or wear, and replace it if necessary.
Keep reading to discover helpful tips and tricks for each step to make the process even easier and safer.
Key Takeaways
- Disconnect the spark plug wire and ensure the mower is on a flat, stable surface before starting.
- Use gloves and a block of wood to prevent blade spinning while loosening blade bolts with a socket wrench.
- Turn the blade bolts counterclockwise to loosen and fully remove them using the correct bolt size tool.
- Carefully detach the blade, noting its orientation by marking or photographing for proper reinstallation.
- Inspect the blade for damage or wear, then clean, sharpen, store, or replace as needed.
Gather Tools and Prepare Your Mower
Before you start removing the blade, make sure you’ve gathered all the necessary tools and prepared your mower properly. You’ll typically need a socket wrench or a blade removal tool, a block of wood to prevent the blade from spinning, and gloves to protect your hands. Check your mower’s manual for the exact blade bolt size to confirm you have the right socket.
Position your mower on a flat surface to keep it stable during the process. If your mower has a grass catcher or deck shield, remove those parts to gain clear access to the blade. Taking these steps means you won’t waste time searching for tools or struggling with restricted access once you begin.
Being prepared sets you up for a smooth, safe blade removal.
Secure Your Mower Safely and Unplug the Spark Plug
While securing your mower, make sure it’s on a level surface and won’t tip over as you work. This stability is vital for your safety and to prevent damage to the mower.
Next, disconnect the spark plug wire from the spark plug itself. This step is necessary because it stops the engine from accidentally starting while you’re handling the blade. Locate the spark plug, usually found on the engine’s side, and pull the wire off carefully.
If your mower has a cover over the spark plug, remove it first. Always keep the spark plug wire away from the plug to avoid unintentional reconnection. Taking these precautions guarantees you can safely move forward with removing the blade without risking injury or damage.
Loosen and Remove the Lawn Mower Blade Bolts
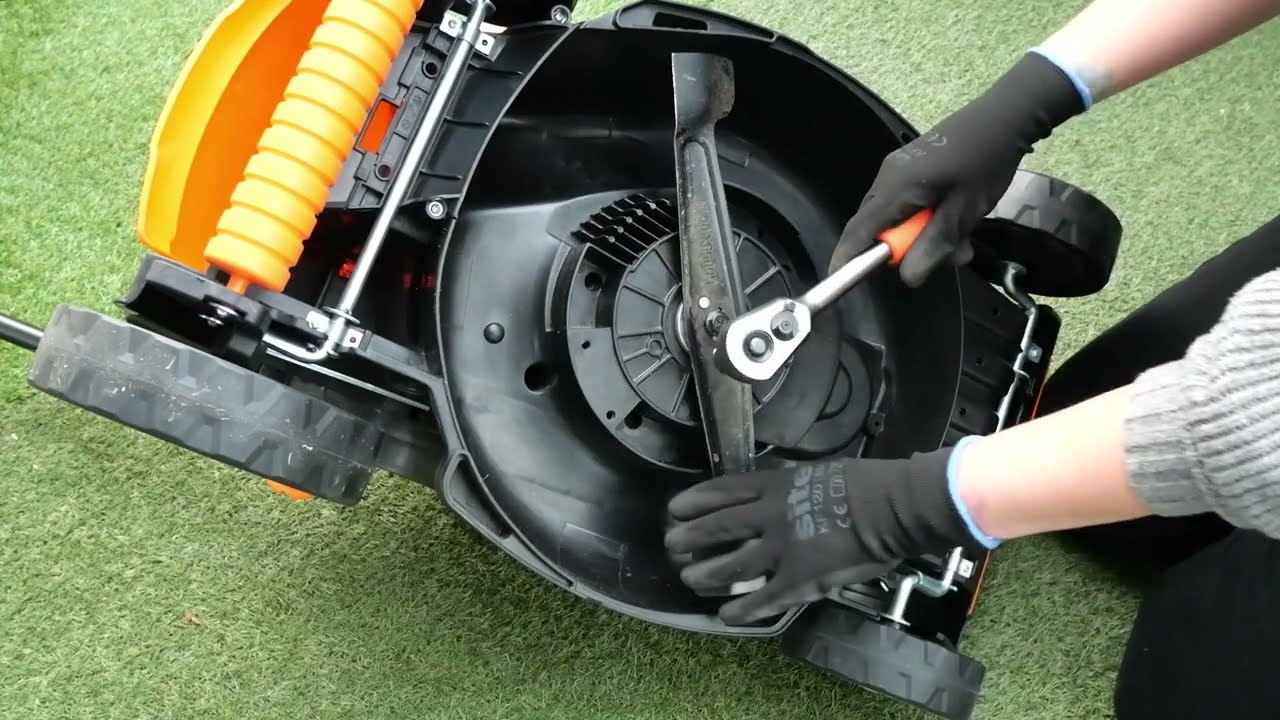
Once you’ve confirmed the mower is stable and the spark plug is disconnected, you can begin loosening the blade bolts. Use a wrench or socket that fits the bolts snugly to avoid stripping them. If the bolts are tight, apply steady, firm pressure to break them loose rather than jerking, which could damage the bolt or tool.
Turning the bolt counterclockwise will loosen it. If the blade spins while you try to loosen the bolts, wedge a piece of wood between the blade and mower deck to hold it steady. Keep in mind, some mowers have multiple bolts, so you’ll need to remove each one.
Once all bolts are loosened and removed, you’re ready for the next step.
Detach the Blade Carefully and Note Its Orientation
Since the bolts are removed, you can now carefully detach the blade from the mower. Be sure to wear gloves to protect your hands from sharp edges. Gently wiggle the blade free, supporting it to prevent it from dropping suddenly.
Take note of the blade’s orientation—observe which side faces down toward the grass and which side faces up. This detail is essential for reinstalling the blade correctly later. If needed, mark the blade or take a photo to remember its positioning.
Avoid forcing the blade off; if it’s stuck, try gently tapping it with a rubber mallet or applying a bit of penetrating oil to loosen it. Handling the blade with care ensures your safety and helps maintain proper mower function when you reinstall it.
Inspect, Store, or Replace the Lawn Mower Blade
Before you decide what to do next, carefully inspect the blade for any signs of damage like cracks, bends, or excessive wear. If you spot any issues, it’s best to replace the blade to guarantee safe and efficient mowing. If the blade looks good but is dull, consider sharpening it before storing or reinstalling.
When storing the blade, clean it thoroughly to remove grass and debris, then keep it in a dry place to prevent rust. Label the blade if you have multiple spares so you can easily identify them later. Remember, using a damaged blade can harm your lawn mower and affect cutting quality, so don’t skip this inspection step.
Proper care will extend your blade’s lifespan and keep your mower running smoothly.
Frequently Asked Questions
How Often Should I Sharpen My Lawn Mower Blade?
You should sharpen your lawn mower blade at least once every 20-25 hours of use or at the start of each mowing season.
If you notice uneven cuts or tearing grass, sharpen it sooner for best results.
Can I Use a Universal Blade for Any Lawn Mower Model?
You can’t use a universal blade for every mower because sizes and mounting styles vary. Always check your mower’s manual or blade specifications to guarantee compatibility, so you don’t risk damage or unsafe operation.
What Are the Signs That Indicate Blade Replacement Is Necessary?
You’ll know it’s time to replace your blade when you see dull edges, uneven cuts, or bent metal.
You’ll notice vibrations, rust, or cracks.
If your lawn looks ragged, you definitely shouldn’t wait any longer.
How Do I Balance a Lawn Mower Blade After Sharpening?
You’ll want to hang the blade on a nail or use a blade balancer tool.
If one side dips lower, grind a bit off the heavier side until it stays horizontal, ensuring smooth, even cutting.
Are There Safety Gloves Recommended for Handling Mower Blades?
Handling mower blades without safety gloves is like juggling knives—dangerous. You’ll want cut-resistant gloves, usually made from Kevlar or reinforced materials, to protect your hands from sharp edges while you work safely and confidently.
These gloves provide an essential barrier against cuts and punctures. Always choose gloves designed specifically for handling sharp tools to ensure maximum protection.
Conclusion
Removing your lawn mower blade is like tending a garden—you prepare your tools, protect your space, and carefully nurture each step. By gathering what you need and handling the blade with care, you guarantee your mower stays healthy and strong.
Just as a gardener prunes to help plants grow, you’re giving your mower a fresh start. Follow these steps, and you’ll keep your mower sharp and ready for every mowing season ahead.
By learning how to remove the lawn mower blade properly, you ensure safety and efficiency. Regular maintenance will extend the life of your equipment. Keep your mower blade clean, sharp, and well-maintained for the best cutting performance.